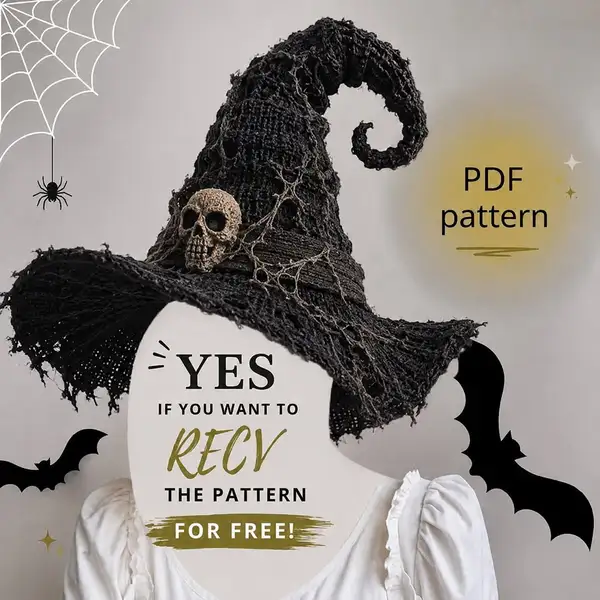
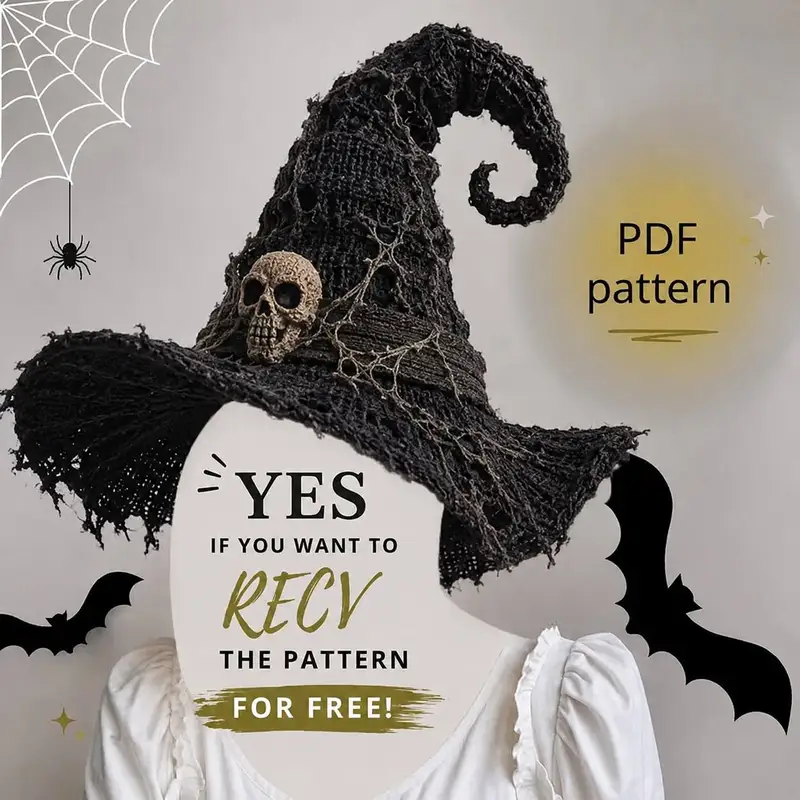
Create a hauntingly beautiful, tattered witch hat with dramatic curl and spooky skull accent. This pattern recreates the textured, distressed brim, tall spiral crown, and decorative webbing seen in the image. Detailed shaping and finishing techniques make this hat perfect for Halloween decor or costume use. Works well with novelty yarns and layered netting for the aged, spooky look.
Progress Tracker
0% Complete
— Crown / Head (Crown that sits on head) :
Round 1 :
6 sc in magic ring (6)
Round 3 :
(1 sc, inc) x 6 (18)
Round 4 :
(2 sc, inc) x 6 (24)
Round 5 :
(3 sc, inc) x 6 (30)
Round 6 :
(4 sc, inc) x 6 (36)
Round 7 :
(5 sc, inc) x 6 (42)
Round 8 :
(6 sc, inc) x 6 (48)
Round 9 :
(7 sc, inc) x 6 (54)
Round 10 :
(8 sc, inc) x 6 (60)
Round 11 :
(9 sc, inc) x 6 (66)
Round 12 :
(10 sc, inc) x 6 (72)
Info :
By Round 12 you should have 72 sts across the crown — this circumference fits most adult heads when using worsted or similar yarn. If using thicker yarn, reduce rounds of increase to reach desired circumference. Place a stitch marker at the start of each round and move it up with each new round.
Round 13-18 :
1 sc in each st (72)
Info :
These even rounds build the vertical height of the crown. Try the hat on or measure to about 10-12 cm from top of head for standard hat height. For a taller witch hat, continue even rounds until desired height (add 2-6 rounds).
Round 19 :
1 sc in each st BLO (72)
Info :
Working one round in BLO creates a subtle ridge and gives a place to attach the hat band later. Keep tension slightly tighter on this round to define the seam.
Round 20-25 :
1 sc in each st (72)
Info :
Continue checking the hat on a head form or mannequin. At Round 24-25 you will prepare to begin the upper crown taper; ensure crown sits comfortably around the forehead and back of head.
Round 26 :
(10 sc, dec) x 6 (66)
Round 27 :
(9 sc, dec) x 6 (60)
Round 28 :
(8 sc, dec) x 6 (54)
Info :
Begin stuffing very lightly with fiberfill if you want a firmer base under the crown — most hats do not require stuffing except at the very tip when forming the spiral. Decreases shape the crown so it will rise into the tall cone shape for the spiral tip.
Round 29 :
(7 sc, dec) x 6 (48)
Round 30 :
(6 sc, dec) x 6 (42)
Round 31 :
(5 sc, dec) x 6 (36)
Round 32 :
(4 sc, dec) x 6 (30)
Round 33 :
(3 sc, dec) x 6 (24)
Info :
At Round 33 the crown narrows dramatically — this is the transition point to the tall cone/spiral section. Leave a long tail to join to the spiral section or do not fasten off if continuing in the same continuous spiral from the crown.
Round 34 :
(2 sc, dec) x 6 (18)
Round 35 :
(1 sc, dec) x 6 (12)
Info :
Fasten off leaving a 40-60 cm tail if you will continue crocheting the spiral tip separately by sewing, or leave the working yarn attached if you will keep crocheting the spiral cone directly from the crown. When working in rounds for structural hats, keep stitches tight to avoid a floppy crown.
— Spiral Tip (Make the tall cone that curls into the spiral) :
Round 1 :
Attach yarn to last round of crown (or start from stitch left) and sc in each of the 12 sts (12)
Round 2 :
(1 sc, inc) x 6 (18)
Round 3 :
(2 sc, inc) x 6 (24)
Round 4 :
(3 sc, inc) x 6 (30)
Round 5 :
1 sc in each st (30)
Info :
These rounds create the base of the cone. The spiral will be long — aim for a cone length of 20-28 cm before shaping the final tight curl.
Round 6 :
1 sc in each st (30)
Round 7 :
1 sc in each st (30)
Round 8 :
(4 sc, dec) x 6 (24)
Round 9 :
1 sc in each st (24)
Round 10 :
(3 sc, dec) x 6 (18)
Info :
Work successive rounds to shape the cone while periodically measuring length. If you want a more slender spiral, work additional decrease rounds earlier to tighten the cone diameter. Leave an internal channel if you wish to insert wire for a poseable spiral.
Round 11 :
1 sc in each st (18)
Round 12 :
(2 sc, dec) x 6 (12)
Round 13 :
1 sc in each st (12)
Round 14 :
(1 sc, dec) x 4, 2 sc (8)
Info :
From here you can transition to working in rows for a graceful spiral curl, adding intentional increases on the outer edge and decreases on the inside edge to encourage curling. Alternatively add flexible wire now by pushing it through the center of the cone until it reaches the tip, leaving the ends wrapped and secured to prevent poking.
Round 15 :
Work 1 sc in each st for 2 rounds to firm (8)
Round 16 :
Dec around to 6 sts (6)
Round 17 :
Sc in each st (6)
Round 18 :
Sc in each st (6)
Round 19 :
Dec around to 3 sts (3)
Info :
Fasten off leaving a 30-40 cm tail. Lightly stuff the last few cm of the cone if you want a rounded tip. To form the spiral, gently bend and curl the cone along its length into the desired spiral and secure stitches with invisible whip-stitches at 1-2 cm intervals along the inner edge where the curl meets itself. The outer edge may be slightly stretched by blocking to sit flat and wavy.
Round 21 :
Using the tail, sew the inner edge of the cone to itself in a shallow spiral shape, spacing seam points 4-6 stitches apart
Round 22 :
Emphasize the spiral by fastening points along the outer seam using matched yarn — these small stitches help maintain curl without visible bulk
Info :
If using wired core, wrap wire inside the last 2-3 cm of the cone and ensure ends are tucked in and wrapped with leftover yarn. For a more natural drape, wet-block the spiral and shape the curl around a cylindrical form until dry.
— Brim (Wide, Tattered Brim) :
Round 1 :
Join yarn to the base of the crown (where brim begins) and sc in each of the 60 sts that were left when shaping the crown (60) — if you have 72, sc in each st (72)
Info :
For a neat join, join with sl st to first stitch, ch1 and work sc into same stitch. If your crown ended at 72 and you want a slightly larger brim base, work sc in 72 sts. The pattern below uses the number '72' as example; adapt counts proportionally to your crown circumference.
Round 2 :
1 sc in each st (72)
Round 3 :
(6 sc, inc) x 9 (81)
Round 4 :
(7 sc, inc) x 9 (90)
Round 5 :
(8 sc, inc) x 9 (99)
Round 6 :
(9 sc, inc) x 9 (108)
Info :
These increase rounds begin to make the brim flare. Count carefully — increasing too fast will create ruffles rather than a smooth flare. Adjust increase frequency to achieve the desired curvature: fewer increases for a flatter brim, more increases for a wavy brim.
Round 7 :
1 sc in each st (108)
Round 8 :
(4 sc, inc) x 18 (126)
Round 9 :
1 sc in each st (126)
Round 10 :
(5 sc, inc) x 21 (147)
Round 11 :
1 sc in each st (147)
Round 12 :
(6 sc, inc) x 21 (168)
Info :
At this stage the brim is becoming very wide. Use a circular, flat surface or a bowl to check for flatness. If brim begins cup-up or ripple, adjust by adding or skipping increase stitches in the next round to flatten.
Round 13 :
1 sc in each st (168)
Round 14 :
Work 1 sc in each st BLO for 2 rounds to create a slightly defined edge (168)
Round 15 :
Switch to a novelty or eyelash yarn (Info below) and work 1 sc in each st for additional texture (168)
Info :
Change to novelty or 'torn' yarn now to create distressed texture on the brim. Carry the base yarn loosely on the wrong side or break and weave in ends. The novelty yarn must be worked with care: use the hook size that allows it to sit close without open holes. This is where the tattered, ragged look is made.
Round 16-20 :
1 sc in each st with novelty yarn (168)
Round 21 :
For jagged edge: *ch3, skip 2 sts, sl st into next st* repeat around until you have alternating picot-like gaps (approx 56 chains)
Round 22 :
Working into the chains of previous round, sc, hdc, dc clusters randomly to create ragged points. Make 56 clusters spaced loosely for distressed fringe.
Info :
Vary cluster heights and skip more stitches in some areas to create an organically torn edge. Trim some yarn ends and pull loops to fray the edge purposefully. If using eyelash yarn, pull some fibers out carefully to increase tatter effect.
Round 23-28 :
Optional: Add 6-8 rounds of loose open mesh to underside of brim (see Web Overlay section) and secure with sl st along join. This creates depth and the impression of layered tattered fabric.
Round 29 :
Work 1 sl st around base of brim into the top of the crown to tidy the join (168)
Info :
At this point the brim should measure 25-30 cm across for a dramatic, floppy silhouette. Use blocking: wet the brim lightly, shape on a flat plate or bowl, pin edges to create desired waves, and allow to dry to set the shape.
— Brim Edge & Distressing (Finishing jagged look) :
Round 1 :
With thin scrap yarn or thread, embroider irregular 'pulls' and 'holes' across the brim edge by threading needle through from underside and pulling loops and snipping small sections (no stitch count)
Info :
Use small cuts and pulls very carefully. Work gradually — less is more. Create frayed edges by teasing fibers and trimming stray threads to match the image's distressed look.
Round 2 :
Create small holes by using a tapestry needle and pulling loops through then snipping to resemble moth-eaten fabric. Space randomly around brim for natural effect.
Round 3 :
Weave a few long strands of novelty yarn across the brim and knot in places to simulate hanging threads and laciness (no stitch count)
Info :
Tackle distressing as the final touch. Too many holes weaken the brim. Aim for aesthetic raggedness while keeping the brim structurally sound. Reinforce any large holes by stitching around the opening with tight sc in a contrasting thread.
— Hat Band and Web Vines :
Round 1 :
Using worsted or a bulky textured yarn, ch 90 or long enough to wrap around crown twice; join with sl st to form a band ring (no numeric sc count)
Round 2 :
Round the band with 1 sc in each ch around to thicken (90 sc)
Round 3 :
Work 3 rounds of 1 sc in each st to create a substantial band (90)
Info :
Wrap the band around the crown and tuck slightly under the ridge created in the crown's BLO round. Pin in several spots to check placement before sewing. The band is intended to be slightly slouched, like a wrap of aged cloth.
Round 4 :
With a thinner yarn, ch 50 and create long crocheted vines: sc in each ch (50), make 3-4 such vines. Use varying lengths for artistic placement.
Round 5 :
To create webbing: ch 8, sl st into 4th ch from hook to make a small loop, ch 8 and join to another point on the band with sl st; repeat to form open triangular web segments until you have a lacey overlay (no fixed stitch count)
Info :
The web overlay is intentionally irregular. Attach vines and webbing by sewing at a few anchor points so the web hangs loosely. Twist and pull fibers for an older, dusty look. You can lightly coat the web with spray starch to stiffen if desired.
— Decorative Skull Applique :
Round 1 :
Using contrast (taupe) yarn: 6 sc in mr (6)
Round 3 :
(1 sc, inc) x 6 (18)
Round 4 :
(2 sc, inc) x 6 (24)
Round 5 :
1 sc in each st (24)
Round 6 :
Switch to smaller hook for detailing. FLO for forehead texture: 1 sc in each st FLO (24)
Round 7 :
(3 sc, dec) x 6 (18)
Round 8 :
(2 sc, dec) x 6 (12)
Round 9 :
Sc around for shape (12)
Info :
This creates a domed base for the skull. For the eye sockets, you will embroider or attach small circular appliques or use tiny black felt circles to create deep-set eyes. Use a tapestry needle to pull the center inward to create concave eye sockets before securing felt pieces.
Round 10 :
Make two small eye cups: ch 5, join with sl st to form ring, sc 5 in ring, fasten off and flatten. Sew these onto skull front and add small black beads or felt for depth (no stitch count)
Round 11 :
For nose: embroider a small upside-down triangular depression using running stitches through the skull center (info technique)
Round 12 :
Make jaw piece: ch 10, sc 9 across, 2 sc in last ch and work along underside to form U-shape jaw. Add rows of sc across jaw to resemble teeth and seam to skull base with whip stitch (no stitch count)
Round 13 :
Lightly stuff skull with fiberfill through opening. Continue shaping with small whip-stitches along seam to flatten and create cavity look (no numeric round)
Info :
If you prefer, use a small resin skull for faster finishing. Sew or glue the skull onto the hat band at the front, then secure web/ vines around it to look integrated. If using crochet skull, embroider fine cracks with darker thread for aged detail.
— Web Overlay & Distressed Mesh (Optional But Recommended) :
Round 1 :
Ch 80 to length needed to drape over brim and band; attach with sl st at one point on band
Round 2 :
Working in ch foundation, *ch 4, sl st in same ch to form small loop* repeat across to create chain loops; stretch and block on hat to dry (no numeric sc total)
Round 3 :
Make connecting strands: ch 20 and join at several random anchor points on band and brim to look like a cobweb connecting across brim (no fixed count)
Info :
Use a thinner yarn or crochet thread for the web to mimic delicate, dusty threads. Work loosely and irregularly. After placement, you can lightly spray the web with diluted fabric stiffener to keep it in place if desired.
Round 4 :
Create small spider loops by chaining 6 and working sc in loops then knotting and attaching to web edges to evoke hanging threads (repeat 6-10 times)
Round 5 :
Weave some of the novelty yarn through the web to create a layered, cobwebbed look (no stitch count)
Info :
Placement of web is artistic — pin then step back to ensure proportion. You can add thin metallic thread lightly for subtle shine or dust with craft paint to highlight yarn texture for an aged appearance.
— Optional Inner Lining (For comfort and finishing) :
Round 1 :
With soft DK cotton, ch enough to fit inside crown circumference (approx 72 ch) and join to form a ring. Work 1 sc in each ch for 6-8 rounds to create a comfortable band (72)
Round 2-6 :
1 sc in each st for additional rounds until lining depth is 2-3 cm (72)
Info :
Sew the lining into the crown interior with hidden stitches for comfort. This also hides tails and secures joins between crown and brim.
— Finishing & Assembly :
Round 1 :
Pin the hat band to the crown ridge; use whip stitch to secure band at 6-8 evenly spaced anchor points. Ensure band sits slightly slanted for witchy aesthetic (no stitch count)
Round 2 :
Sew the skull applique to the front center of the band using the long tail left from skull. Reinforce with a second pass of stitches at top and bottom of skull (no numeric count)
Round 3 :
Attach web overlay by sewing through anchor points using small, discrete backstitches. Ensure vines drape at sides and web crosses brim in selective places (no stitch count)
Round 4 :
Weave in all ends by threading tails through the crown body and trimming close to fabric. Tidy any fuzzy bits of novelty yarn with sharp scissors.
Info :
Once assembled, lightly spray the entire hat with a mixture of water and fabric starch and shape the spiral and brim until nearly dry, pinning the brim edges to create desired ruffles. Let fully dry before removing pins to set the shape permanently.
Round 5 :
Add final aesthetic touches: embroider small cracks on skull, add small resin bones or tiny spiders to web, and optionally lightly brush on chalk paint for dusty highlights (no stitch count)
Info :
Final touches make a big difference — contrast paint on raised textures highlights the aged look. If using paint, apply sparingly to avoid stiffening novelty yarn severely.
This spooky witch hat pattern brings theatrical flair and textured detail to your Halloween wardrobe! The tall spiral crown and tattered brim create an instantly dramatic silhouette, while the skull and webbing make it uniquely eerie. With shaping and finishing techniques explained step-by-step, you can recreate the haunted, vintage look with confidence. 🧶🕸️ Wear it proudly on Halloween or display it as seasonal decor. Happy crafting — enjoy every spooky stitch! 🎃