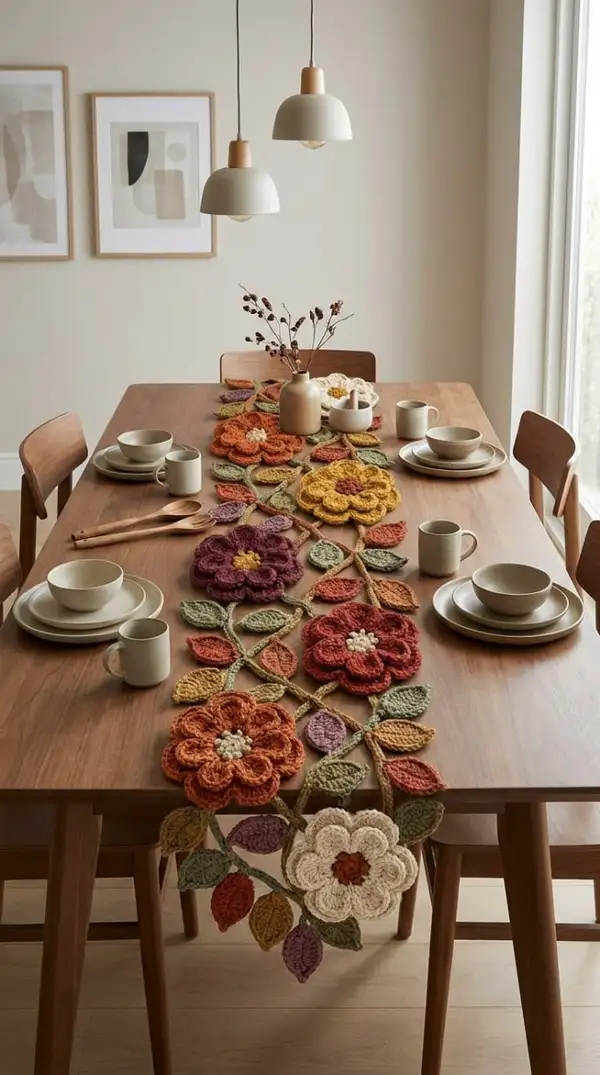
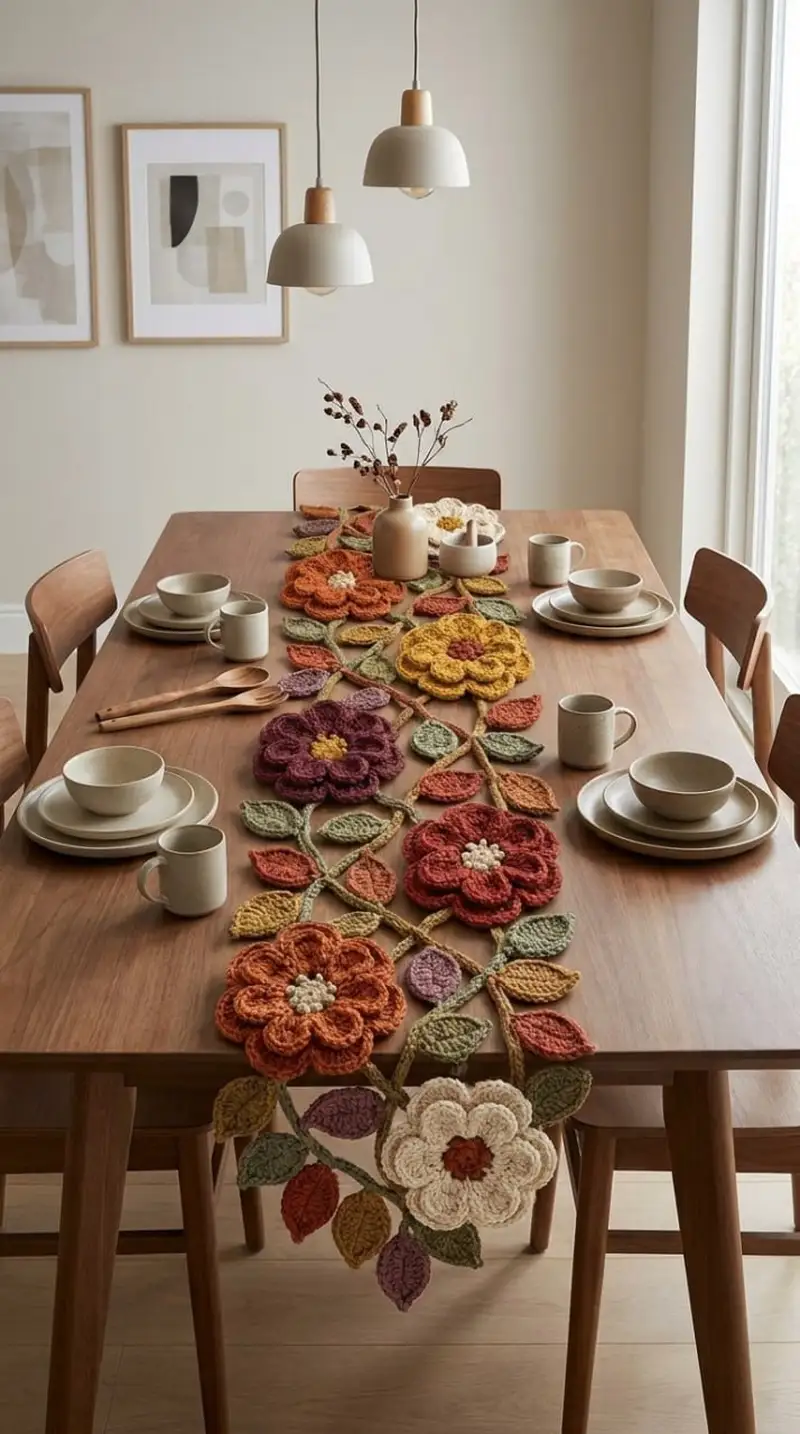
A warm, vintage-inspired table runner covered in layered 3D flowers, leaves and braided stems. This pattern creates chunky, textured blossoms and sculpted leaves in autumnal shades — perfect for a cozy dining table centerpiece. Each flower is made of a textured center and six sculpted petals, joined by long crocheted stems and staggered leaves for an organic, overflowing look.
Progress Tracker
0% Complete
— Flower Center :
Round 1 :
6 sc in magic ring (6)
Round 3 :
(1 sc, 1 inc) x 6 (18)
Round 4 :
(2 sc, 1 inc) x 6 (24)
Round 5 :
(3 sc, 1 inc) x 6 (30)
Info :
Use a slightly tighter tension for the center so the bobble texture sits proud. You may insert a small pinch of stuffing later to puff the center. Keep a marker at the first stitch of each round.
Round 6 :
1 sc in each st (30)
Round 7 :
(1 sc, 1 puff) x 15 (30 stitches before and after puff anchors remain counted as 30)
Info :
To make the textured bobble effect: for each 'puff' anchor, work a puff stitch into the same stitch (yarn over, insert, pull up loop 4 times, yarn over, pull through all loops), secure with sl st in the next stitch if desired. Keep stitch count by placing the puffs where the single crochets are also worked.
Round 8 :
1 sc evenly around the exterior (30). Fasten off leaving long tail for sewing to petals.
Info :
If you prefer a raised center with cluster bobbles: replace Round 7 with (1 sc, bobble) x 10 and work Round 8 as even sc round to anchor bobbles. Lightly stuff center after Round 7 and before Round 8 for more dimension.
— Petal (Make 6 per flower) :
Petal 1 - Round 1 :
Join petal color to the center by slip stitching to a designated stitch on Round 5 or 6 of center. Ch 6, sc in 2nd ch from hook, hdc in next, dc in next 2 sts, hdc in next, sc in last ch (5 stitches along chain plus base join)
Petal 1 - Round 2 :
Turn and work on the opposite side of the chain: sc in first st, hdc in next, dc in next 2 sts, hdc in next, sc in last (do not count join) — shape forms an oval (10 sts total on oval)
Petal 1 - Round 3 :
Along petal edge: ch1, 1 sc in first 2 sts, (1 hdc, 2 dc, 1 hdc) in center top st to create the petal point, 1 sc in last 2 sts — sl st to base join on center. This establishes petal peak and dimension.
Info :
Work petals with slightly looser tension than the center so they lie nicely outward. Always join the petal base to the center with a secure sl st, leaving a bit of slack so the petal can be shaped away from the center.
Petal 1 - Round 4 :
Edge round: ch1, sc evenly around petal working 2 sc in the ends (where the chain turned) to round the shape; join with sl st to the first sc of petal edge (approx 16 sc across the oval)
Petal 1 - Round 5 :
Texture round: 1 sc in each st BLO (16). This creates a defined ridge that helps petals hold shape.
Petal 1 - Round 6 :
Finishing round: (sc, sc in next st around) to tidy edges and create slight scallop where the petal top is (16). Fasten off and leave a long tail for sewing if needed.
Info :
Make petal 1 the template for all six petals. Keep consistent counts so petals match. If you want a larger petal, start with ch8 instead of ch6 and follow proportional increases in rounds.
Petal 2 - Round 1 :
Repeat Petal 1 - Round 1 instructions, joining to the center approximately 6-8 stitches clockwise from petal 1. Ch 6, sc in 2nd ch from hook, hdc, dc x2, hdc, sc (oval established)
Petal 2 - Round 2 :
Work opposite side of chain: sc, hdc, dc x2, hdc, sc (10)
Petal 2 - Round 3 :
Top shaping: ch1, sc x2, (hdc, 2 dc, hdc) in top, sc x2; sl st to base join on center (oval shaped)
Petal 2 - Round 4 :
Edge round: sc evenly around, increasing 2 sc in the chain-turn ends (approx 16 sc)
Petal 2 - Round 5 :
1 sc in each st BLO (16)
Petal 2 - Round 6 :
Finish: 1 sc around smoothing top scallop; fasten off (16)
Info :
Position Petal 2 so its base slightly overlaps Petal 1 to create a compact rounded flower. If you prefer more open petals, space them further apart around center.
Petal 3 through Petal 6 :
Repeat Petal instructions (Rounds 1-6) for Petals 3, 4, 5 and 6, joining each to the center at even intervals. Place markers on the center round to space 6 petals evenly (every 5 stitches if center round has 30 sts). Maintain identical stitch counts for symmetry.
Info :
After all six petals are attached, look for gaps near the join. Use a yarn needle and the long tails to pull the base of each petal slightly closer to the center or to each other to avoid visible holes. Weave tails inside or to the backside of the center.
— Petal Outer Ruffle & Texture (All petals together) :
Round 1 :
With working yarn attached to any petal edge, ch1, *sc in next 2 sts, (hdc, 2 dc, 1 hdc) in the petal top, sc in next 2 sts; rep from * around each petal to create a decorative outer ruffle. This does not change counts dramatically but creates a repeating scallop across each petal peak.
Round 2 :
1 sc in each st BLO across this new ruffle (maintain same count as previous round since increases were balanced across petal peaks)
Round 3 :
Finishing edge: 1 sc evenly around entire flower edge, placing 2 sc in the chain-turn points to keep the shape flat (approx 120 sc total across 6 petals if each petal averages 16 sc; adjust based on actual counts)
Info :
This outer ruffle helps petals sit upright and adds that layered depth you see in the image. Keep the same edge treatment for each flower to achieve cohesive look when motifs are joined.
— Small Inner Cluster (Optional) :
Round 1 :
Using a contrast lighter color, form a small 6 sc magic ring (6)
Round 3 :
1 sc in each st (12). Fasten off leaving long tail for sewing. Sew this little disc to the very center atop the bobble cluster to add a tiny contrasting eye.
Info :
I recommend making the optional inner cluster if you want extra contrast and a more finished, layered center like the photo. It can be slightly stuffed with a pinch of fiberfill before sewing in place.
— Leaf (Make many: recommend 30–40 total) :
Leaf - Round 1 :
Ch 8, sc in 2nd ch from hook, hdc in next, dc in next 3, hdc in next, sc in last ch; work back along opposite side of foundation chain: sc, hdc, dc x3, hdc, sc and sl st to join to last base stitch creating an oval leaf (approx 16 stitches per leaf)
Leaf - Round 2 :
Ch1, sc evenly around leaf placing 2 sc in the chain-turns to form pointy ends (approx 20 sc)
Leaf - Round 3 :
1 sc in each st BLO to create a central ridge that will look like the midrib (20)
Leaf - Round 4 :
Using contrasting green tone if desired, work a single decorative line: 1 sl st in the center top and then embroider a stem with a yarn needle through the leaf fabric. Fasten off. Leave long tail for sewing.
Info :
Blocking: pin leaves gently on a flat surface and steam or mist lightly to flatten edges. This yields crisp edges when you attach leaves to stems. Make assorted colors for autumnal palette: olive, sage, mustard, terracotta.
Leaf - Variation A (Pointed longer leaf) :
Ch 10 and follow same edge/return pattern increasing the center dc count to 5 for a longer leaf. Edge and BLO ridge as above (approx 22–24 sts).
Info :
Make both short and long leaves to create visual interest along the runner. For the photographed runner, alternate short and long leaves regularly, and mix colors across the vine.
— Stem / Connecting Chain :
Round 1 :
Using stem color (olive/khaki), ch desired length for your runner vine segment (e.g., ch 40 for a mid-length connection between flowers). Join with sl st to the central back of a flower (where petals meet center) to anchor.
Round 2 :
Row-style: working back along the chain, sc in 2nd ch from hook and each ch to the anchor point (39 sc). This creates a sturdier, cord-like stem.
Round 3 :
1 sc in each st BLO across stem to add subtle ridge and to reduce twist (39)
Info :
For thicker stems, work two parallel chains and join them with sc across to make an I-cord like stem. Alternatively, crochet a small i-cord by working sc in back bumps. Length of stem segments can be varied to create organic spacing.
Round 4 :
Position leaves along stem: use leaf tails to whip stitch leaves to the stem at even intervals (e.g., every 6–8 stitches) on alternating sides for a natural vine look.
Info :
When sewing leaves, catch only a few strands of the stem to keep seams subtle. Pin each leaf first to find best angles — slightly tilt leaves upward or downward to create movement.
— Joining Flowers into Runner :
Step 1 :
Make 7–9 flower motifs depending on desired runner length. The photo shows about 7 large flowers with staggered leaves; plan for that as a default layout for a 70–90 cm table runner.
Step 2 :
Arrange flowers on a flat surface in a single row with slight overlaps so petals of adjacent flowers brush or slightly overlap. Place stems between each flower linking centers with ch 30–50 stem chains as required.
Info :
Spacing recommendation: for a full table runner, place flowers about 18–22 cm apart center-to-center with stems/leaf clusters filling the gaps. Adjust spacing based on your table width and preferred fullness.
Step 3 :
Sew stems to flower backs using mattress or whip stitch through the flower's petal underside and the stem's foundation chain. Be sure stitches are invisible from the top surface.
Step 4 :
Where stems cross or overlap, use a few securing stitches to anchor intersections so the runner holds its layout when moved.
Info :
For a cleaner finish, slip stitch stems together at crossing points using the back loops only to create a subtle knotted effect that mimics vine junctions.
— Border & Finishing (Edge Rounds) :
Round 1 :
Once all motifs are assembled, with stem color attached at one end, work a single crochet border around the entire outer edge of the runner where fabric exists (around outermost petals and leaves) — work 1 sc in each exposed stitch, 2 sc in corners or chain-turn edges to prevent cupping.
Round 2 :
Sc in each st BLO to create a raised braided frame effect (this helps runner edges sit flat) — maintain the same total stitch count across the border as Round 1 but place 2 sc in points where necessary to keep it flat.
Round 3 :
Decorative picot round (optional): *sc 4, ch3, sl st to 1st ch to form picot, sl st into next sc; rep from * around. Fasten off and weave in all ends neatly to the back of runner.
Info :
Blocking the whole runner gently (pin to shape and lightly steam from a distance) will settle stitches and shape petals and leaves. Do not press directly with a hot iron. Allow to air dry thoroughly.
— Alternate Petal Texture (Optional Variation) :
Round 1 :
Instead of the simple petal oval, create textured petals by working 3 rounds of dc clusters at the peak: ch6 foundation, work cluster stitches at top (3 dc cluster, chain anchors) and return for 2 rounds of sc in BLO to create ridges. This yields a puffier petal top similar to the deep petals in the photo.
Info :
This variation will increase stitch counts slightly; if using textured petals, make sure to add a tidy single crochet edge to keep joining counts consistent across all petals when attaching to center.
— Measurements and Yield :
Info :
Approximate finished measurements (photographed runner): around 160 cm long and 28–32 cm wide including petals and leaves. Using suggested repeats (7–9 flowers and 30–40 leaves) will approximate this length; for a shorter runner use 5–6 flowers, for a table topper 3–4 flowers.
Info :
Yarn usage estimate: one flower (center + 6 petals + small inner cluster) uses roughly 30–40g of worsted yarn; each leaf uses 6–8g; stems and joins use around 80–120g total depending on length. Plan yarn purchases accordingly.
— Final Tips & Notes :
Info :
Keep a consistent palette to ensure flowers read as a cohesive set on the table. Make test motifs in your color combo before committing to the full runner to ensure contrast and balance match your vision.
Info :
For clean unseen joins, sew petals' long tails to the center with ladder stitch and then use small invisible stitches to attach stems to the underside of centers. Trim and weave in all tails into internal joins of stems and underside of petals.
Info :
Label each completed motif as you make them (A, B, C) to plan placement so color distribution along the runner feels balanced when you assemble.
This vintage-inspired floral runner is a wonderful way to bring handcrafted warmth to your dining space. The layered petals and sculpted leaves create beautiful texture and seasonal charm. Each motif is an opportunity to play with color and placement, making every runner unique. Enjoy the rhythmic process of making and joining motifs and delight in the finished centerpiece. 🧶🌿