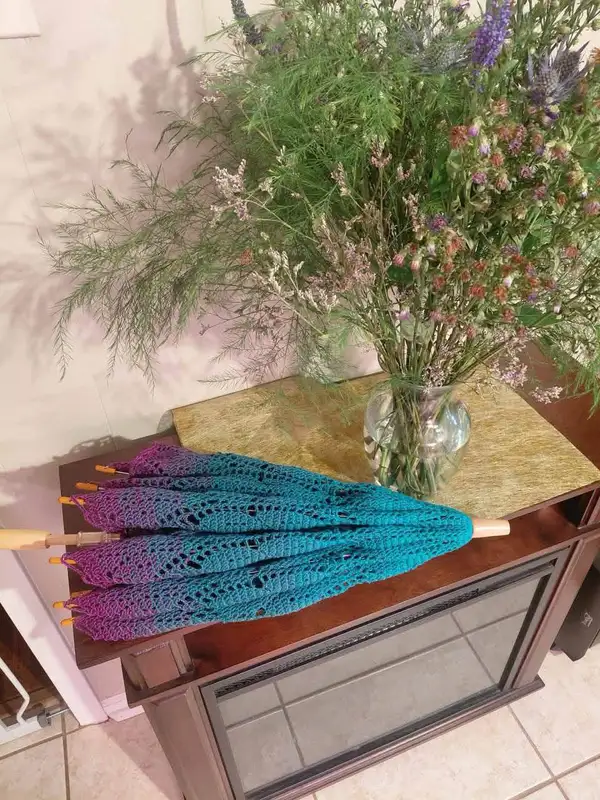
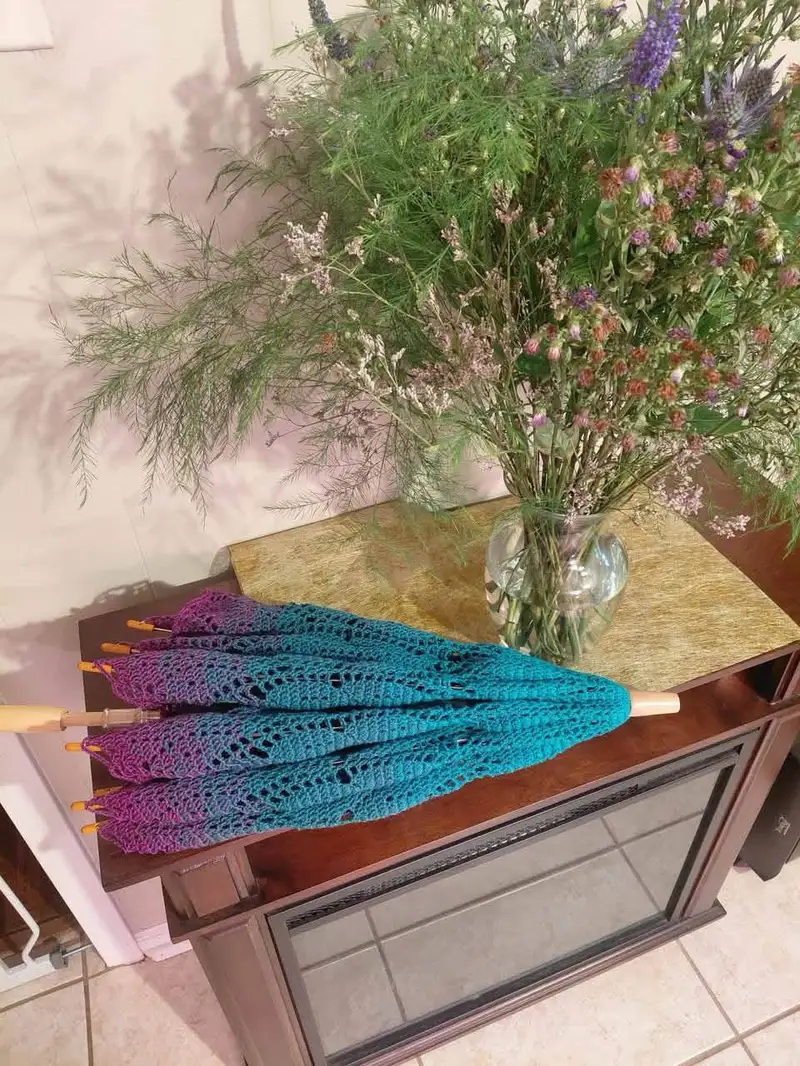
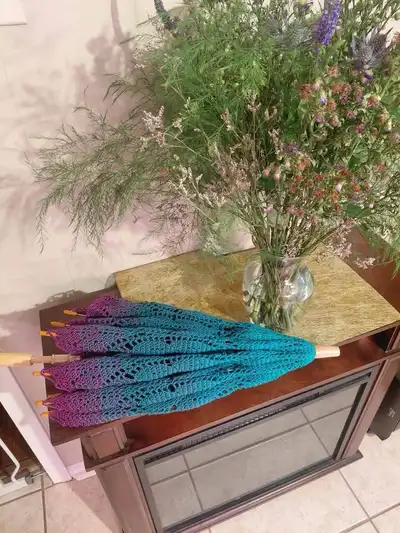
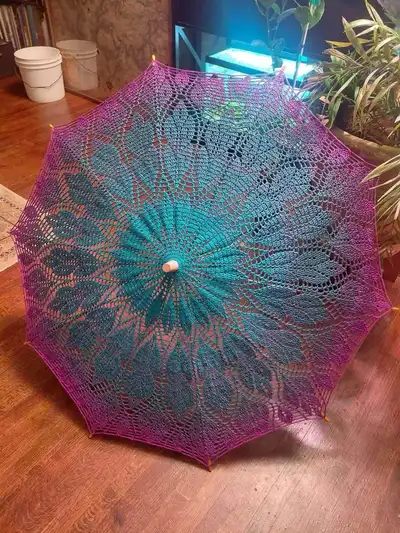
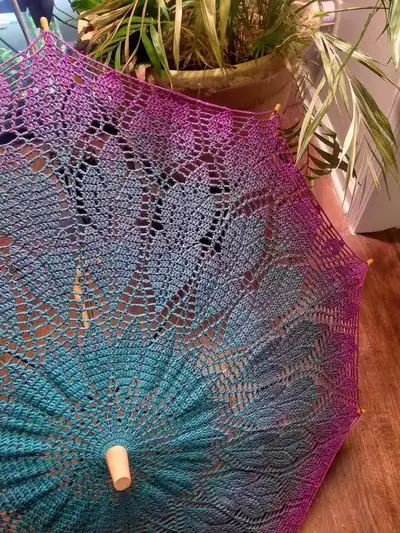
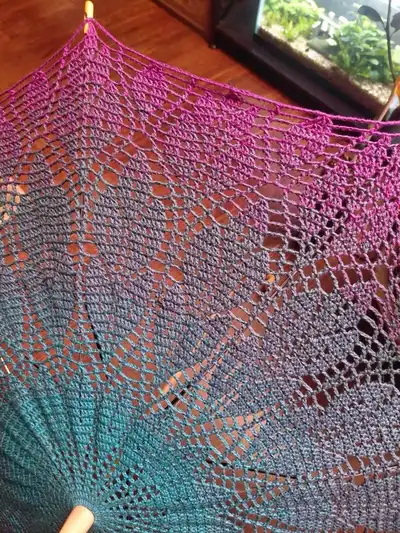
Create a romantic lace parasol with this detailed crochet pattern. The canopy is worked in the round from the center out, forming a petal-style lace motif that radiates to a scalloped edge. Gradient yarn blends from teal to violet create the dreamy ombre effect seen in the photos. This pattern includes step-by-step round counts, placement notes for umbrella ribs, blocking and assembly tips to make a functional, beautiful parasol.
Progress Tracker
0% Complete
— Centre Crown (Begin canopy) :
Round 1 :
Make a magic ring. Ch1 and work 16 sc into the ring. Pull tight. (16)
Round 2 :
(1 sc, inc) x16. (32)
Info :
Use a marker to indicate the first stitch of the round; you will maintain this marker and move it at each round for accurate radial alignment. Keep tension even—this center will determine flatness of entire canopy.
Round 3 :
(2 sc, inc) x16. (48)
Round 4 :
(3 sc, inc) x16. (64)
Round 5 :
(4 sc, inc) x16. (80)
Info :
At this point you have a small disc. If your center is cupping (pulling up), try slightly looser tension; if ruffling, you may have increased too often—check counts.
Round 6 :
(5 sc, inc) x16. (96)
Round 7 :
(6 sc, inc) x16. (112)
Round 8 :
1 sc in each st around. (112)
Round 9 :
1 sc in each st around. (112)
Info :
Rounds 8-9 stabilize the diameter before lace motif work. If your yarn is very elastic, block the center lightly before continuing to keep the circle flat.
Round 10 :
*Ch3 (counts as dc), skip next 3 st, dc in next st; ch2, sk 3, dc in next st* Repeat between * to * 16 times to begin creating radial chain spaces for petal placement. After final repeat, join with sl st to top of starting ch3. (16 chain-2 spaces, total stitch count approximately 48 dc + 16 ch-spaces)
Info :
This round introduces the first large chain arches that will form petal separators. Count your repeats carefully—there should be 16 arches corresponding to 16 ribs.
Round 11 :
Join in first ch-2 sp. Ch4 (counts as tr), 2 tr in same sp, ch3, 3 tr in same sp (a 3-3 tr cluster separated by ch3) - this forms the base of a petal. Sk next dc cluster, join into next ch-2 sp. Rep across to form 16 petal bases. Join. (Each petal base = two clusters of 3 tr, separated by ch-3)
Round 12 :
Starting in the ch-3 space at top of first petal base: ch4 (counts tr), (2 tr, ch2, 2 tr) all into ch-3 space, forming an extended petal top. Sl st into base join between petals. Rep across 16 petals. (This round raises petal height)
Info :
Keep your petals carefully stacked—use pins temporarily if needed to ensure petals sit properly before you expand the canopy. The height you build here determines the visual petal shape.
Round 13 :
Ch1, sc into same place, (ch5, sk to next petal top, sc into center top) around, creating long chain loops between petal tops. You should have 16 ch-5 loops. Join. (These chain loops will be used to create the next lace row.)
Round 14 :
In each ch-5 loop work: (sc, hdc, 4 dc, hdc, sc) to form a fan shell. After doing all 16 fans, join. Each fan increases the stitch count moderately—your new total will be 16 x (1+1+4+1+1)=112 plus base posts—mathematically the canopy has grown in surface without explosive stitch increases.
Round 15 :
Ch3, dc in next 3 sts, ch3, skip all of fan to next designated join point (about 6-8 sts depending on your fan stitch distribution), dc in next chain join. Repeat to create a net-like ring between fans. Join. (This forms first lace mesh band.)
Info :
Use this mesh band to check radial symmetry; count the number of dc clusters between each petal—each wedge should match. If it differs, adjust by unworking and re-distributing stitches slightly.
Round 16 :
Ch1, sc into same stitch, (ch7, sc into center of next fan) x16. (Creates 16 long chain-7 arches.)
Round 17 :
In each ch-7 arch: sc, (2 dc, ch3, 2 dc), sc (a small shell). Join. This begins forming the larger 2nd tier petals. The stitch count increases by 16 shells; new total remains a multiple of 16.
Round 18 :
Ch3, 2 dc in next st, 3 dc in ch-3 of shell, 2 dc in next st, ch4, sl st into next shell center. Repeat around. This builds an elongated petal top that will begin the radial motif seen in the photos.
Info :
From here on we will alternate textured rounds (shells) and open rounds (chains) to allow stable increases while producing lace. Keep each repetitive section to 16 identical repeats to maintain spokes.
Round 19 :
Ch1, sc in same, (ch9, sc in next shell center) x16. (16 ch-9 loops)
Round 20 :
Work into each ch-9 loop: sc, hdc, (5 dc), hdc, sc (fan). This is a large fan; each fan uses 9 stitches to create a fuller petal. After all fans are worked join. Count: 16 fans totaling 16*(1+1+5+1+1)=144 main stitches plus posts.
Round 21 :
Ch3, dc in next 5 sts, ch5, sk to next fan center, dc in next 6 sts. Repeat. This introduces elongated open arcs and chain-5 valleys between major petals.
Info :
At rounds 20-21 the canopy has a clear petal motif; if petals begin to ripple, reduce hook size by half a mm for subsequent rounds or add a stabilizing round of sc between motifs.
Round 22 :
Ch1, sc into same stitch, (ch11, sc into center of fan) x16. (16 ch-11 arches)
Round 23 :
Work (sc, hdc, 7 dc, hdc, sc) into each ch-11 arch. Join. This adds width and will expand the diameter significantly by roughly 16*11 = 176 stitches of fan bulk across the round (represented as 11-stitch fan each).
Round 24 :
Ch3, (dc, ch2, dc) across top of fan to create small bridges, sl st to next fan top. Repeat all around creating a delicate bridge-ring. This keeps increases moderate while preserving lace openings.
Info :
Count stitches carefully: because we are increasing fan widths, stitch counts will balloon; however each round remains a multiple of 16 repeats. If any wedge has extra or missing stitches, tighten or loosen the adjacent fan's dc counts by working one fewer or one extra dc in a specified fan to even things out.
Round 25 :
Ch1, sc, (ch13, sc into next fan top) x16. (16 ch-13 arches)
Round 26 :
Into each ch-13 arch work: sc, hdc, (9 dc), hdc, sc. Join. Count: each arch becomes a 13-stitch fan (sc, hdc, 9dc, hdc, sc) - maintain your 16 repeats.
Round 27 :
Ch3, dc in next 9 sts, ch7, sl st at base between fans. Repeat to create larger open chains between petals. This round begins to emulate the larger leaf/petal shapes visible in the umbrella photo.
Info :
These large chains will be used to anchor later leaf-shaped fillings. If your yarn is pooling (gradient lines), keep the color change in mind when creating large arches for a smooth gradient appearance.
Round 28 :
Ch1, sc in same stitch, (ch15, sc into each fan top) x16. (16 ch-15 arches)
Round 29 :
Working into each ch-15 arch: sc, hdc, (11 dc, ch3, 11 dc), hdc, sc. This forms a tall petal with a central ch3 lace eye. Join. The stitch count around each repeat increases but remains balanced per 16 repeats.
Round 30 :
Ch4, tr in next 5 sts, ch3, tr in next 6 sts, sl st to next petal top. Repeat to create textural ribs inside each petal. These posts will later be the canvas for the leaf filling rows.
Info :
Do not worry if counting absolute stitch numbers is large; the important element is that each of the 16 wedges has identical stitch architecture. Use extra markers to mark the start and end of one wedge to compare as you progress.
Round 31 :
Ch1, sc across the top of each tr group and into the ch3 space: (sc, ch5, sc) into each ch3 space, and sc over tr posts to next wedge. Repeat across 16 wedges to create chain-laced windows inside each petal.
Round 32 :
In each ch-5 loop work: (sc, hdc, 7 dc, hdc, sc) to create internal fans that will form the leaf fill. Join. This gives the petal interior a dense leaf motif contrasting the open surrounding mesh.
Info :
At this stage the canopy is broad. Lay it on a flat surface periodically to ensure it remains flat and symmetrical. If tilting occurs, block lightly and re-check tension.
Round 33 :
Ch3, dc in next 11 sts, ch9, sl st at base between fans. Repeat all around to form larger windows between petals.
Round 34 :
Ch1, sc in same, (ch17, sc into next fan center) x16. (16 ch-17 loops)
Round 35 :
Work: sc, hdc, (13 dc), hdc, sc into each ch-17 loop. Join. These extended fans create the dramatic petal silhouette seen when the parasol is opened in the second photo.
Info :
Because these fans are large, keep your yarn tension comfortable; if stitches feel crowded, you may substitute ch-19 loops and (15 dc) fans to keep the fabric flat. Any change must remain uniform across repeats.
Round 36 :
Ch3, 2 dc in each of next 6 sts, ch11, 2 dc in next 6 sts, sl st to next fan top. Repeat around. This rounds out the petal top and begins the second ring of netting.
Round 37 :
Ch1, sc into same, (ch9, sc between the second dc of each grouped set) x32 to create a mesh of ch-9 bridges; there will be two bridges per wedge now. Join.
Info :
Round 37 is a transitional mesh and will be used to stabilize the next set of leaf clusters. Place pins at each rib (there will be 16) to mark later rib attachment points.
Round 38 :
Into each ch-9 arch work (sc, hdc, 9 dc, hdc, sc). Join. Repeat across all ch-9 arches. The canopy continues to expand—check that increases are happening evenly across all spokes (16 repeats).
Round 39 :
Ch3, dc in next 13 sts, ch7, skip to next arch top, dc in next 14 sts. Repeat to create a looser net. Join.
Round 40 :
Ch1, sc in same stitch, (ch21, sc in next designated top) x16. (16 ch-21 loops). This very large chain sets up the outer leaf/petal lace that forms the clear leaf clusters visible before edging.
Round 41 :
In each ch-21: sc, hdc, (15 dc, ch5, 15 dc), hdc, sc. Join. This produces tall elongated leaf-shaped fans with a central chain eye. These correspond to large leaf motif visible along the canopy.
Info :
Because of large fans the canopy will expand quickly. Measure diameter periodically — the parasol should be roughly the diameter of your open umbrella frame. Adjust future rounds to match frame size by stopping earlier or working additional mesh rows.
Round 42 :
Ch3, tr in next 17 sts, ch11, tr in next 18 sts. Repeat around creating tall post ribs inside each large leaf fan. These tris will show as textured ribs in the photos.
Round 43 :
Ch1, sc across tr groups and into large ch-5 eye: (sc, ch7, sc) into each ch-5 eye. Repeat around; this forms an airy open chain inside each leaf.
Round 44 :
Into each ch-7 loop work: (sc, hdc, 11 dc, hdc, sc) to bulk the leaf interior. Join. This adds internal texture to the leaf motif mirroring the photos where leaves have dense centers and lacy borders.
Info :
Count the number of tall leaf fans: it should be 16. If your canopy is larger than your frame, omit the next full fan round and move to mesh stabilizing rounds until the diameter matches.
Round 45 :
Ch3, dc across next 15 sts, ch9, sl st at base between leaves. Repeat. This will create long chain valleys ready for final decorative rows.
Round 46 :
Ch1, sc across top, (picot, ch5, picot) into chain valleys between leaves to add textured openwork. Repeat around and join. The picot adds the subtle pointed lace edging seen near the canopy edge before the scallop.
Round 47 :
Ch1, sc in same, (ch11, sc in picot base) x32. (Note: now working more repeats across the outer mesh; you will have doubled repeat points as the design widens.)
Round 48 :
Into each ch-11 arch work (sc, hdc, 9 dc, hdc, sc) producing a finer mesh ring that narrows outward while preserving openwork. Join. This ring helps transition the large leaves into the edging scallops.
Info :
If you are aiming to attach to a 16-rib frame, hold this round up to the ribs to test fit. You can add or subtract one mesh round to reach the desired diameter.
Round 49 :
Ch3, dc across next 9 sts, ch5, sl st to next arch top. Repeat. This smaller mesh will make the scallop base stable.
Round 50 :
Ch1, sc into same, (ch7, sc into next arch top) x48. (Three times the original wedge number—this sets up the scallop multiples; mathematically you now have 48 small arches.)
Round 51 :
Work into each ch-7 arch: (sc, hdc, 7 dc, hdc, sc). Join. These become scallop petals; you should have 48 small scallop fans around the edge.
Info :
Edge rounds convert the large radial motif into small scallops. This is the point to finalize diameter vs. rib spacing before committing to heavy finishing rounds. Count arches and compare to number of ribs (16). You will later group 3 scallops per rib attachment point.
Round 52 :
Ch1, sc across top of each fan, (ch5, sc into center of next fan) x48 to create small chain bridges between scallops. Join.
Round 53 :
Into each ch-5 loop work (sc, 5 dc, sc). After all loops are worked join. This strengthens each scallop while keeping edge light.
Round 54 :
Ch1, sc in same, (ch9, sc over next fan join) x48. Join. These ch-9 loops prepare for final picot edge and rib loops.
Round 55 :
Work (sc, picot, sc) into each ch-9 loop center - this creates delicate picots across the edge. Join. After this round the edge has decorative points similar to photos where the final edge has tiny peaks.
Info :
At this time consider color change: if you plan a contrasting edge in purple/pink, change yarn before Round 56. To change color cleanly, finish Round 55, drop old color, join new color with sl st at same join point.
Round 56 :
Info :
Change to edge color (if desired). Join new color with sl st to any stitch at edge. Otherwise continue with same color.
Round 57 :
Ch1, sc around edge working 3 sc into each scallop peak to slightly firm the edge; join. Work evenly to make a reinforced edge for rib attachment.
Round 58 :
Ch6, sl st into every third sc along edge, forming 16 evenly spaced long loops to be used as rib attachment loops. If you are not getting exactly 16 loops, adjust spacing by measuring and placing loops roughly evenly around circumference. You should have 16 loops total to correspond to ribs.
Info :
Mark these loops with clips or contrasting markers. These are critical: they will sit at the rib tips when the parasol is closed (see photos showing small loops at tips). The loops must be evenly spaced and reinforced for strength.
Round 59 :
Reinforce each rib loop by working back into each loop: sc around the loop (10 sc around each), then sl st to next edge sc. Join after reinforcing all 16 loops. This step ensures loops are sturdy and will not tear when attached to wooden rib tips.
Round 60 :
Fastening round: Ch1, sc in each st around to even out the edge and hide raw ends of rib loop reinforcements. Join and finish off. Weave in long yarn tails and secure with multiple passes through rounds 56-59 for reinforcement.
Info :
After Round 60 the canopy is structurally complete. If your canopy diameter is smaller than needed for your frame, undo Rounds 50-56 and add an additional mesh ring between Rounds 46 and 47. Always maintain multiples consistent with 16 ribs.
— Panels (Petal repeats and alternate variant) :
Info :
The canopy is constructed of radial panel repeats (16 wedges). Below is a breakdown of one wedge repeat sequence that composes the repeated petal panels between the basic rounds already worked. This subsection expands the petal interior if you want denser leaves (optional). Work these wedge repeats in sequence around each wedge starting at the wedge top marker; when you complete one wedge sequence, move to the next wedge and repeat.
Wedge Round 1 :
At wedge center top, ch1, sc, (ch3, 3 dc in next ch-space, ch3, sc) — small shell to add interior texture. Repeat once per wedge interior where desired.
Wedge Round 2 :
Ch2, hdc around the shell, ch4, sl st to adjacent post. Repeat. This creates interior rib quilting and can be used to anchor additional décor like beads (optional).
Info :
These wedge panels are optional and intended for makers wanting more textured leaves. Because they sit inside existing fans, only add them if yarn quantity and frame spacing permit.
Wedge Round 3 :
Ch1, sc around and join to main canopy. If you worked any wedge additions, ensure you finish with an even sc round to maintain shape consistency.
Info :
Count all wedge additions to ensure the same number of stitches were added to each corresponding wedge. If you skipped a hook size previously, wedge additions will help fill gaps.
— Ribs & Attachment Preparation (Arms) :
Info :
The parasol frame in the photos has 16 wooden ribs. The final canopy edge is arranged into 16 reinforced loops. Use the loops to attach the rib tips. For each rib tip you will sew the loop securely using strong thread and a small upholstery needle. The following instructions guide the attachment and optional rib reinforcement rounds.
Rib Prep 1 :
Measure the distance between adjacent loops—each should align with a rib tip. Insert a marker on each rib tip to correspond to loops. Lay canopy over open frame to check alignment. If canopy is slightly larger, gently ease excess by distributing into the curve at each rib rather than forcing to one side.
Rib Prep 2 :
Use upholstery thread and whip stitch to sew each loop to its corresponding rib tip. Pass the needle through the loop multiple times, around the wooden tip and back through multiple stitches of canopy edge to spread load. Tie and weave ends through the adjacent sc rounds for security.
Info :
For extra durability, you can run a very fine line of fabric glue around the wood tip before sewing and press the loop against it to secure. Work carefully—glue may show through lace if too much is applied.
Rib Prep 3 :
After attaching all rib tips, open the parasol and test for even tension. If any wedge is pulled tighter, re-check the corresponding loop attachment and redistribute stitches, sewing additional catches into the adjacent edge rounds to even tension.
— Edge Scallop & Finishing :
Round 61 :
(Optional firming round) With same edge color, work 1 sc in each st around, placing 3 sc into peaks and 1 sc into valleys; join. This evens the edge prior to final blocking.
Round 62 :
Work a final decorative scallop: *skip 2 sc, (5 dc in next sc), skip 2 sc, sl st in next sc* Repeat around. This yields a pronounced scallop visible in the photos where each umbrella rib shows a small pointed curve.
Info :
If using contrasting yarn for the scallop, work this round in the new color and weave ends in securely across multiple rounds so color change does not affect firmness.
Round 63 :
Fasten off leaving long tail. Weave end through edge rounds and pull tight to close any gaps at specific rib joins. Knot securely and hide tail across two rounds for security.
Info :
Now that canopy is complete, move to blocking. Pin the canopy to roughly the exact shape of your open parasol frame on a soft surface. Spray lightly with water and allow to dry thoroughly; consider using light starch for a crisp finish. This creates the taut surface seen in the photos.
— Optional Handle Sleeve & Closure (Tail/Strap) :
Round 1 :
Using the same yarn, pick up a stitch at the inner crown (where canopy meets central ferrule). Ch1, sc 24 evenly around the base of the canopy's center, join. This will form a small sleeve to cover the parasol ferrule if desired.
Round 2 :
Work 1 sc in each st for 6 rounds or until sleeve length matches ferrule height. Fasten off and weave in ends. This gives a tidy look to the canopy center and hides the frame's hardware.
Info :
You may also create a narrow strap by chaining 30-40 sts and sewing one end to the canopy edge near one rib and the other to a small button for closure when parasol is closed.
— Assembly & Final Adjustments :
Info :
Once canopy is fully blocked and dry, re-check spacing of rib attachment loops and re-sew any loose ones. Adjust tension at each rib by adding a few discreet whip stitches into adjacent edge rounds to ensure the canopy opens into a symmetrical dome.
Finish :
Test the parasol opening and closing several times; if any lace loops bind on ribs, trim inner threads or add a small dab of beeswax to the rib ends to smooth them. If an edge scallop catches when folding, you may reduce scallop depth by reworking final scallop row with 3 dc instead of 5 dc per cluster.
Info :
For long-term maintenance, keep parasol dry and away from excessive humidity. Re-block if the canopy loses shape. For decorative displays, spray with fabric stiffener to keep the canopy permanently firm.
This lace parasol is a joy to make and a showstopper to display. Each round reveals another detail of the petal motif, and the gradient yarn paints the canopy in color as you work. The process of blocking and attaching ribs is surprisingly satisfying—watching the lace spring to life into a perfect dome is a reward in itself. Enjoy every stitch and the craftsmanship you bring to this elegant accessory! ☀️🧶